Start with the right photo
Diamond painting reduces a photo to a grid of solid-coloured drills. Every choice you make afterwards is easier if the photo you start with suits that process. These qualities help most:
- A clear subject. One person, one pet or one object, filling a good part of the frame.
- Good, even light. Daylight from a window is ideal. Harsh flash and deep shadows both create blotchy areas.
- Sharp focus. Blur turns into vague, muddy patches of drills.
- Contrast between subject and background. A dark cat on a dark sofa will merge; the same cat on a light floor stands out.
- A simple background. Busy patterned backgrounds produce scattered drills that compete with the subject.
Photos that often struggle are group shots taken from far away, night scenes, pictures with fine text, and anything already heavily filtered. If you only have a less-than-ideal photo, cropping tightly around the subject is the single most effective fix.
Preparing the photo
The diamond painting pattern generator accepts common image types, including iPhone HEIC photos, and processes them on your device. Before converting, use the crop option to trim each edge so the subject fills the frame. Brightness, contrast and saturation sliders are available too: a little extra contrast often helps a flat-looking photo, while very bright, saturated colours can look stronger than you expect once they are drills.
If the background is plain and you would rather leave it out, skip background can remove white, transparent or a picked colour with an adjustable tolerance.
Square or round drills
The choice affects both the finished look and the size of the piece.
| Square drills | Round drills | |
|---|---|---|
| Size per drill | about 2.5 mm | about 2.8 mm (Diamond Dotz: 2.88 mm) |
| Coverage | Edge to edge, few gaps | Small gaps between drills |
| Look | Crisp, mosaic-like | Sparkly, softer edges |
| Placing | Needs care to keep rows straight | More forgiving |
| Good for | Portraits, fine detail | Relaxed projects, bold designs |
Many people find square drills more satisfying for photo designs because the full coverage keeps detail sharp. Others prefer round drills because they are quicker to place and less fiddly to line up. If you are unsure, consider which part of the process you will enjoy more: the precision or the flow.
Choosing a size
Size is set in drills across. The default is 160, and the generator allows anything from 40 to 400. Because drill size differs, the same number of drills gives a different finished width:
| Drills across | Width with square drills | Width with round drills |
|---|---|---|
| 120 | 30 cm | 33.6 cm |
| 160 | 40 cm | 44.8 cm |
| 200 | 50 cm | 56 cm |
| 240 | 60 cm | 67.2 cm |
Working the other way, from a canvas you already have, here is how many drills fit common drill areas:
| Drill area | Square drills (2.5 mm) | Total | Round drills (2.8 mm) | Total |
|---|---|---|---|---|
| 20 × 25 cm | 80 × 100 | 8,000 | 71 × 89 | 6,319 |
| 30 × 40 cm | 120 × 160 | 19,200 | 107 × 142 | 15,194 |
| 40 × 50 cm | 160 × 200 | 32,000 | 142 × 178 | 25,276 |
| 50 × 65 cm | 200 × 260 | 52,000 | 178 × 232 | 41,296 |
| 60 × 80 cm | 240 × 320 | 76,800 | 214 × 285 | 60,990 |
| 80 × 100 cm | 320 × 400 | 128,000 | 285 × 357 | 101,745 |
Bigger is not only about wall space. More drills across means more room for detail, so faces in particular benefit from larger sizes. A pet portrait at 80 drills across can look like a cartoon; at 160 or more the fur texture and the sparkle in the eyes start to come through.
Here is the same photo at three widths, so you can see what the extra drills buy:
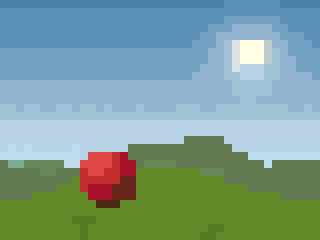 40 drills wide10 cm with square drills · 20 colours
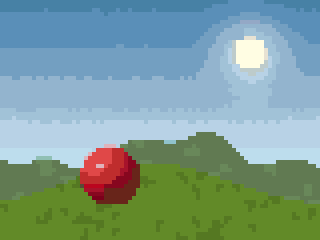 80 drills wide20 cm with square drills · 26 colours
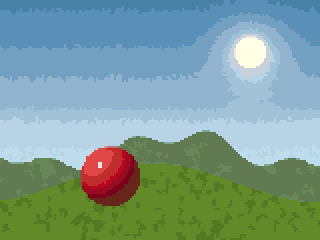 160 drills wide40 cm with square drills · 25 colours
The height follows from the proportions of your cropped photo, so crop to the shape you want first.
Choosing the number of colours
Diamond painting patterns can use anywhere from 5 to 120 drill colours, with 40 as the default. More colours allow smoother skin tones and subtler shadows, but each extra colour means another bag of drills and more switching.
Some guidelines:
- Bold graphics and simple pets: 15 to 30 colours often look great.
- Portraits and landscapes: 40 to 70 colours give smoother gradients.
- Large, highly detailed pieces: up to 100 or more, if the size is big enough to show them.
Watch the stitchability score under the preview. Although the name comes from stitching, the factors are the same for drills: how many drills sit alone among other colours, how long the runs of one colour are, and whether the colour count suits the size. If the tips mention scattered single drills, the confetti guide explains how cleanup levels tidy them without losing deliberate highlights such as catchlights in the eyes.
Drill colours use DMC® numbering, which is common across diamond painting suppliers. The DMC colour chart lets you browse every colour with its number and name.
Counting drills
Each cell in the pattern is one drill, so the count is simple multiplication. CraftPatterns then adds 10% to each colour as spares. For a 160 × 120 design that fills the whole grid:
- cells: 160 × 120 = 19,200
- with 10% spares: about 21,120 drills
The colour key in the PDF gives this per colour, along with a symbol for each, and the CSV shopping list is handy for ordering. If you skipped the background, the empty cells are not counted, so the total will be lower.
From pattern to canvas
Most diamond painting canvases come pre-printed with symbols and adhesive. If you are working from your own printed chart instead, the PDF includes symbol pages with a bold line every 10 drills and numbering along the edges, plus optional full-colour pages. Our guide to printing pattern PDFs covers paper size and scaling.
While you work, the stitch tracker can mark finished areas and highlight one colour at a time, which is useful for planning which drill bag to open next. Many people work one colour at a time across a section, then move on, keeping the area they are not working on covered to protect the adhesive.
Cropping for the shape you want
Diamond painting canvases are often hung or framed, so the final shape matters as much as the subject. A portrait-format crop suits a single person or a seated pet; a wide crop suits landscapes and group scenes. Because the pattern height follows the photo’s proportions, decide on the frame or wall space first, then crop the photo to match before you set the size.
It also helps to leave a little breathing room around the subject. A face cropped right to the chin and the top of the hair can feel cramped once it is surrounded by a frame. A small margin of background, especially a plain one, gives the subject space and costs only a few extra rows of drills.
A quick checklist
- Choose a clear, well-lit photo and crop it tightly.
- Decide on square or round drills.
- Set the size based on detail as well as wall space.
- Start with around 40 colours and adjust from the preview.
- Check the stitchability tips and raise confetti cleanup if needed.
- Download the PDF and shopping list, and order drills with spares included.